Thursday, September 15, 2016
Payment Method in Oracle HRMS
After completing the Core HR Structure we have to do the Payroll Setup.
Firstly, we need a create a Payment Method here through which we will be paying the employees.
Navigation: HRMS Manager>Payroll>Payment Methods
Initially the Costing Tab is disabled here which can be enabled using the below:
select * from
PAY_LEGISLATIVE_FIELD_INFO where Field_name = 'COSTING_TAB'
Look if the above query retrieves a row for your legislation.If No then Insert using the below query.
insert into
PAY_LEGISLATIVE_FIELD_INFO(Field_name,Validation_type,Validation_name,Rule_type,Rule_mode,Target_location,Legislation_code) values('COSTING_TAB','TAB_PAGE_PROPERTY','DISPLAY','DISPLAY','Y','PAYWSDPM','SA')
Enter the required details in each Tab.
Friday, September 9, 2016
Creating Job,Grade,Grade Rate and Positions in Oracle HRMS
We will now create Jobs,Grades,Grade Rate and Positions.
Job:
Navigation: HRMS Manager>Work Structure>Job>Description
To add values in Evaluation we need to enter values in Lookups: EVAL_SYSTEM and EVAL_SYSTEM_MEAS
Evaluation DFF: Additional Evaluation Details.
Grade:
Navigation: HRMS Manager>Work Structure>Grade>Description
Grade Rate: Used to set the Minimum and Maximum value for each Grades in the Organization.
Navigation: HRMS Manager>Work Structure>Grade Rate>Description
Positions:
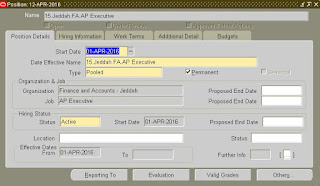
Position Types:
Single Incumbent: Can
associate only 1 person like CEO,CFO,CIO of the company
Shared: Defines
how many people are going to share a position
Pooled: One
position can be used by multiple people.
None: No
rules are applied
Full Time Equivalent (FTE) :It is the
maximum limit a position can have in an organization. eg. – an organization can
has only 1 CEO so FTE = 1 and Headcount = 1.Their can be 3 shifts for a single position like Manager so FTE = 1 and
Headcount = 3.
Headcount: The
maximum number of people who can share a position.
Labels:
FTE,
Grade,
Grade Rate,
Headcount,
Job,
Oracle EBS,
Oracle HRMS,
Position,
Position Types
Creating Location and Organization in Oracle HRMS
First step in Oracle to do the Organization Setup but before this we need to create Locations.
Navigation: HRMS Manager>Work Structures>Location
Scope: Global if we want to use the same location across multiple Business Groups.We also need to set profile HR:Cross Business Group for this case.
Local if we want to use within a single Business Group.
Create the required number of locations depending on the requirement.
Now, we will create a Business Group.
Navigation: HRMS Manager>Work Structure>Organization>Description
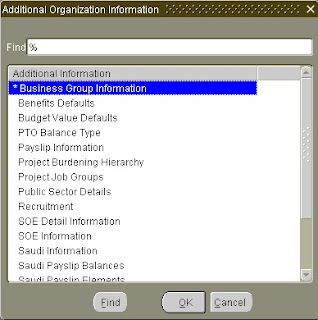
For Business Group we need to select the Organization Classification as 'Business Group' and enable it.Click on Others and enter Additional Information as required.
Attach the KFF's created in Business Group Information.
HR Organization classification is used if we want to create employees under this Organization.
Other classifications are Registered Company,GRE/Legal Entity etc, We can create our own Organization Classification by extending values in ORG_CLASS lookup in Other Application Utilities.
Now, we need to enable below profiles for this Responsibility:
HR: Security Type: Park Business Group
HR: Business Group: Park Business Group
Creating HRMS Manager Responsibility
Now, that the Flexfields setup is done we will create a HRMS Manager Responsibility where we will do further configuration.
Navigation: System Administrator>Security>Responsibility>Define
Here I am using Saudi Legislation Menu (SA HRMS Navigator) which you can select as per your Legislation.
We also need to select a Request Group in order to process the Concurrent Requests.
After this we need to set HR: Security Profile.
Here we selected HR with Payroll User because we are doing setup for both Core HR & Payroll. The other two options available are HR User and Payroll User.
Now, we are all set to do the Core HR configuration.
Thursday, September 8, 2016
Creating Cost Allocation Flexfield
Costing can be done at 5 different Levels in Payroll i.e. Payroll,Element Link,Organization,Assignment and Element Entry with Payroll being the highest default and Element Entry being ultimate override.
Levels can be viewed in this diagram as provided by Oracle.
Also, before creating Cost Allocation Flexfield we have to understand the Accounting Segments used in GL as we need to synchronize our Payroll Data with GL. Open Accounting Flexfield to understand it.
Now, we will create a Costing Flexfield.
Navigation: Application Developer>Flexfields>Key>Segments
Query Cost Allocation Flexfield.
Unfreeze the Flexfield Definition.
Create a New Cost Allocation Flexfield.
Click Allow Dynamic Insert.
Click on Segments.
Click on each segment's Flexfield Qualifier and set the levels at which you want to enter the accounting
Freeze the Flexfield Definition and save it.
Creating People Group Flexfield
Navigation: Application Developer>Flexfields>Key>Segments
Query People Group Flexfield.
Unfreeze the Flexfield Definition.
Create a New People Group Flexfield.
Click Allow Dynamic Insert.
Click on Segments. Here my requirement is to decide the eligibility and amount of Housing and Transport Allowance and pay them accordingly so I created four segments as below.
Attached the Value Sets with each Segment.
Freeze the Flexfield Definition and Save it.
Creating Grade Flexfield
Query Grade Flexfield.
Unfreeze the Flexfield Definition.
Create a New Grade Flexfield.
Click Allow Dynamic Insert.
Click on Segments.
Open Value Set and attach the required value set with segment.
Save the details and freeze Flexfield Definition.
Creating Position Flexfield
Navigation: Application Developer>Flexfields>Key>Segments
Query Position Flexfield.
Unfreeze the Flexfield Definition.
Create a New Position Flexfield.
Click Allow Dynamic Insert.
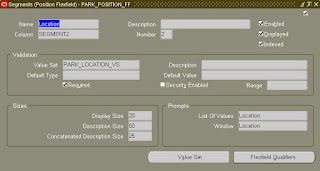
Click on Segments.Here I am using 4 different Segments as per my requirement.
Click on Value Set at each Segment to attach it.

Save the details and freeze flexfield definition.
Query Position Flexfield.
Unfreeze the Flexfield Definition.
Create a New Position Flexfield.
Click Allow Dynamic Insert.
Click on Segments.Here I am using 4 different Segments as per my requirement.
Click on Value Set at each Segment to attach it.

Save the details and freeze flexfield definition.
Creating Job Flexfield
Navigation: Application Developer>Flexfields>Key>Segments
Query Job Flexfield.
Unfreeze the Flexfield Definition.
Create a New Job Flexfield.
Click Allow Dynamic Insert.
Now, click on Segments and here we can create 30 different segments based on specific requirements but I have used only 1 segment.
After giving a name to Segment we need to attach Value Set to it. Click on Value Set and attach it.
Save it.
Now, freeze the Flex field Definition.We have successfully created a Job Flexfield.
Query Job Flexfield.
Unfreeze the Flexfield Definition.
Create a New Job Flexfield.
Click Allow Dynamic Insert.
After giving a name to Segment we need to attach Value Set to it. Click on Value Set and attach it.
Save it.
Now, freeze the Flex field Definition.We have successfully created a Job Flexfield.
Create Value Sets
Based on the requirement we need to create Value Sets for Job, Position, Grade, People Group and Cost Allocation.
An example for Job Value Set is given below:
Navigation: Application Developer>Application>Validation>Set

Save and close it.
Open Values and enter the Jobs required in your organization.

Similarly we will create Value Sets for other Flex Fields also.
An example for Job Value Set is given below:
Navigation: Application Developer>Application>Validation>Set

Save and close it.
Open Values and enter the Jobs required in your organization.

Similarly we will create Value Sets for other Flex Fields also.
Setup Steps in Oracle HRMS
The following steps need to be followed in order to setup Oracle HRMS. They are:
1. Create Value Sets for Job, Position, People Group, Cost, Competency and Grade.
2. Create Key FlexFields for Job, Position, People Group and Position and attach the Value Sets created above.
3. Create a Responsibility for HRMS Manager.
4. Navigate to HRMS Manager Responsility and create Locations.
5. Enable HR: User Type profile for this reponsibility.
6. Create a Business Group.
7. Enable HR: Business Group and HR: Security Profile.
8. Create Organizations.
9. Create Organization Hierarchy.
10. Create Job.
11. Create Grades.
12. Create Positions.
13. Create Payment Methods.
14. Create Payroll Definition.
15. Create an element for Basic Salary.
16. Create a Salary Basis using the above element.
17. Create other Salary Components and their Link.
18. Create Fast Formulas.
19. Create Employees and Add Salary Components.
20. Setup Retro-Pay.
21. Process Payroll Run/Quickpay.
22. Process Prepayments.
23. Process Payment Output File.
24. Process Costing.
25. Process Transfer to GL.
I will discuss about each step in details in later posts.
Subscribe to:
Comments (Atom)


